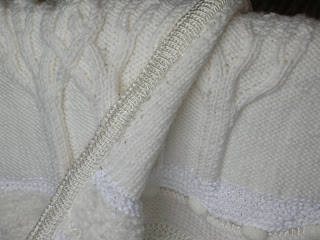
Heute berichte ich über eine Methode, die ich mir als 10-jährige einfallen ließ, um den Kragen und die Blenden auf der Vorderseite und auf der Rückseite der Arbeit gleichwertig schön aussehen zu lassen. Diese Methode habe ich bis heute weder in den zahlreichen Modedesignpublikationen noch in der Stricktechnikliteratur gesehen, es dürfte also wirklich meine eigene Erfindung sein. Sollte dem nicht so sein, so freue ich mich auf zahlreiche Hinweise und Kommentare, dann kann ich mir wohl eine Patentanmeldung sparen. :-)
***
Today I want to present my own knitting method how to make edging on fronts and on collars looking beautiful both right and wrong side of knits. I got the idea for it as a 10 year old and have never yet seen similar method in numerous fashion magazines or literature describing knitting techniques – so it might just be so that I really invented it. In case that I reinvent the wheel, please inform me about relevant sources, so that I can save me from applying for a patent. :-) Anyway, I’d appreciate your comments.
Ich nenne diese Methode für mich Doppelreihen-Technik oder Doppelnaht.
I named this method “Double-layers-technique” or “Tween Seams”.
I named this method “Double-layers-technique” or “Tween Seams”.
Die ursprüngliche Idee war, den Rand von beiden Seiten so umzustricken, dass er unsichtbar wird. Natürlich kann das auch so gemacht werden, dass die Blende einfach umgeschlagen wird und an der Rückseite angenäht wird. Nur mir gefällt halt diese Methode nicht so sehr. Da habe ich dann gedacht: ich stricke einfach gleichzeitig mit 2 Nadeln, einer auf der Vorderseite und einer auf der Rückseite. Also muss ich wohl gleichzeitig auf beide Nadel anschlagen. Wie das geht, zeigen am besten folgende Fotos.
***
***
The original idea was, to knit around the edges in that way that they become invisible. This surely can be done in other way, too – f.e. by folding the ribbing to a half and sewing it on the wrong side of knit. But I didn’t like the visual impression of this method. So I thought following: I will simply knit simultaneously with two needles; one on the right side of the work the other on the wrong side of the work. This requires one simultaneous cast-on on both needles. Following pictures show how I did it.
Zunächst aber das Ergebnis. Auf den ersten beiden Fotos habe ich mit Doppelreihen-Technik eine der vorderen Blenden schon umstrickt. Fotos zeigen Vorderseite und Rückseite. Da merkt man gar keinen Unterschied.
***
But let me show you the result first. This two pictures show finished “Double-layers-technique” on the fronts. The first one shows right side of work, the second one shows wrong side of work. There is no difference at all between both.
In den nachfolgenden Fotos werden von der Daumenspitze nach links Doppelreihen für den Kragen angeschlagen.
***
Following pictures show how to make double layers for the collar. In this case I started at the top of my thumb and casted-on into the left direction.
***
Following pictures show how to make double layers for the collar. In this case I started at the top of my thumb and casted-on into the left direction.
Grundsätzlich wird eine Masche mit Häkelnadel nach vorne geholt und dabei wird im Hintergrund einmal um die dort parallel liegende zweite Rundstricknadel umgeschlagen. Dann wird die mit der Häkelnadel geholte Masche auf die vordere erste Rundstricknadel abgehoben. Fertig.
***
Basicly speaking you are just making a loop with a crochet hook and before that you wrap the working yarn over the second cn which you hold behind of work. Then you pass the loop onto the first cn which you hold in front of work. That’s it.
***
Basicly speaking you are just making a loop with a crochet hook and before that you wrap the working yarn over the second cn which you hold behind of work. Then you pass the loop onto the first cn which you hold in front of work. That’s it.
Was passiert? Der Rand wird beidseitig schön umschlossen. Sind alle Maschen angeschlagen, wird mit einer dritten Rundnadel gestrickt. Hinreihe auf der vorderen Nadel, Rückreihe auf der hinteren Nadel, wohlgemerkt beide im gleichen Maschenmuster. Das führt zu diesem Ergebnis:
***
What happens? You enclose the edging from both sides. After you finished with double cast on, you knit with 3rd cn working one row on the 1st cn and then one row on 2nd cn, both rows in the same stitch pattern. Following picture shows a result of it:
***
What happens? You enclose the edging from both sides. After you finished with double cast on, you knit with 3rd cn working one row on the 1st cn and then one row on 2nd cn, both rows in the same stitch pattern. Following picture shows a result of it:
Nach einer gewünschten Höhe bestehen einige Möglichkeiten. Entweder alle Maschen mit 3-Nadel-Technik auf eine Nadel zusammenführen und abketten. Ergebnis zeige ich auf dem nächsten Foto. Es entsteht ein Wulst.
***
After reaching desired length there are several possibilities. One of them is to join all stitches with 3-needle-joining technique to just one needle and bind off. The result of it is sort of a coil as on the next picture.
***
After reaching desired length there are several possibilities. One of them is to join all stitches with 3-needle-joining technique to just one needle and bind off. The result of it is sort of a coil as on the next picture.
Oder, die Doppelreihen werden separat abgekettet. Das ist nützlich, denn dadurch entsteht eine Art Kassette. In der Mitte kann z.B. ein Kragen eingenäht werden und die Doppelreihen beidseitig an den Kragen angenäht werden. Da verschwinden buchstäblich alle Ränder. Zusätzlich erhält der Kragen durch den Wulst eine ausgezeichnete Formstabilität.
***
Next possibility is to bind off double layers separately. This produces a sort of cartridge. You can insert a collar in the middle of it, fix it with the edge in the middle and sew the edges of double layers on the collar. In that way you practically let all edges disappear. In addition the coil gives the collar its perfect form stability.
Für TüftlerInnen: man kann auch übertreiben und mehrere solche Wülste nacheinander mit einem Muster dazwischen als ganz einzigartige Abschlüsse für Ärmel, Blenden und Jackenränder ausführen, wohl wissend, dass die Methode Vorteile und Nachteile hat.
***
If you love to tinker around: you are wellcome to exaggerate doing such coils one after the other using different stitch pattern panels in between. This provides some stunning endings on cuffs, jacket’s bottoms or elsewhere. Having said that be concious of the fact that this would have both advantages and weaknesses.


